


")


Microsoft presented numerous system processes in Windows 10 with the best of intentions. Be that as it may, they have bit by bit turned into a genuine annoyance. Superfetch is one such procedure that causes high disk usage in Windows 10 PCs, bringing about sluggish execution. Windows clients, sooner or later in their lives, have confronted high disk usage due to “Service Host Superfetch” taking up memory in the Task Manager. In the event that it happens to be one of you, here is all that you have to think about Superfetch.
Table of Contents
What is Service Host Superfetch?
Windows Superfetch was initially presented with Windows Vista as a successor to PreFetch. It’s a procedure which analyzes your system—explicitly your RAM usage—to generate a profile of the programs and applications you run regularly. As you utilize your system, Superfetch step by step realizes what you run frequently and will pre-emptively load elements of those applications onto your RAM with the goal that when you need them, they load up far quicker than they may otherwise.
The principle motivation behind the feature is to speed up application load times for those running hard drives—particularly more seasoned ones. Those running a solid-state drive (SSD) won’t see much improvement from the feature since by default Superfetch does not load applications into memory if an SSD is identified on your system. Notwithstanding, the service is dynamic by default. If you run a mixed drive system—like utilizing a bigger hard drive for storage purposes while the OS runs on an SSD—it will almost certainly improve the performance of any applications running from that drive without interfering with SSD operation.
In short, hard drives should see a noticeable improvement in performance because of Superfetch, however SSD-driven applications won’t.
How does Service Host Superfetch go wrong?
Superfetch may get somewhat overzealous with its preloading as well. Some have announced specific slowdown while booting Windows where their hard drive is compelled to load up a lot of applications before Windows has had room schedule-wise to load its important applications and services. That may prove worthwhile if you’re going to run those applications, yet if you’re not, Superfetch ends up slowing down your PC so as to reduce slowdown later, which is counter-intuitive.
Various Windows clients have additionally noted Superfetch causing spikes of hard drive and CPU usage, particularly during gaming sessions. This gives off an impression of being, for the most part, constrained to those running systems with fewer than 4GB of RAM. It’s conceivable that in light of the manner in which games will get and drop RAM as and when it’s required, that Superfetch is acting as a burden and causing gameplay stutters while everything rearranges around in memory.
How to disable Superfetch?
If your system is running fine without any slowdowns, it’s far-fetched you’ll see any sort of advantage from turning off Superfetch. Nonetheless, should you face spikes of CPU or HDD usage, it’s absolutely worthwhile disabling Superfetch, at any rate incidentally, to check whether that can help clear up the issue. Here’s how to do it.
Disable Superfetch in Windows Services
- Press the Windows Key + “R” or on the other hand, type “Run” in the Windows 10 search box and click the corresponding app entry in the results list.
- Type “Services.msc” into the “Open” box and click the “OK” button, or hit Enter.
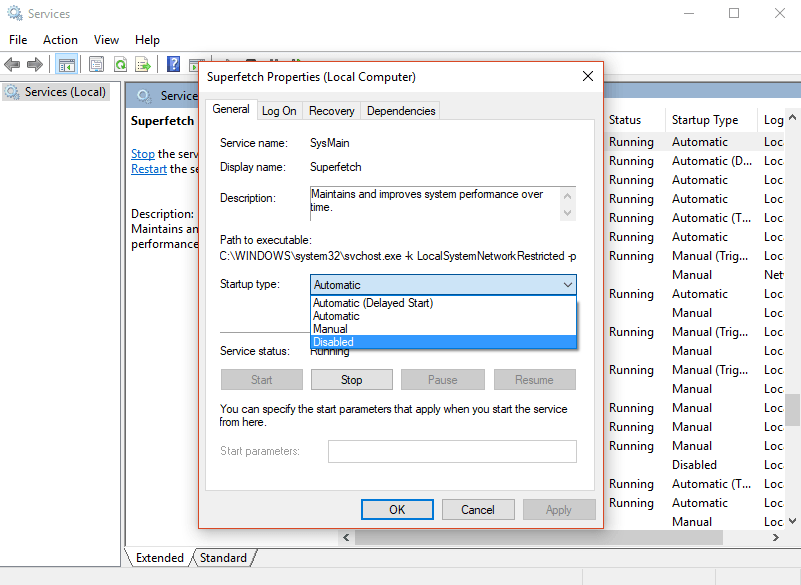
- Scroll down the list of services until you find “Superfetch.” Right-click on that entry and then select “Stop,” from the resulting menu.
- To prevent it from starting again when Windows next boots up, right-click again and select “Properties“.
- In the drop-down menu alongside “Startup Type,” select “Disabled.”
Disable Superfetch in the registry
If you find yourself progressively happy with digging through the Windows registry to adjust a portion of its functions, you’re in karma! You can disable Superfetch from that point as well. Here’s the secret.
- Press the Windows Key + “R” or then again, type “Run” in the Windows 10 search box and click the corresponding app entry in the results list.
- Type “Regedit” into the “Open” box and click the “OK” button, or hit enter.
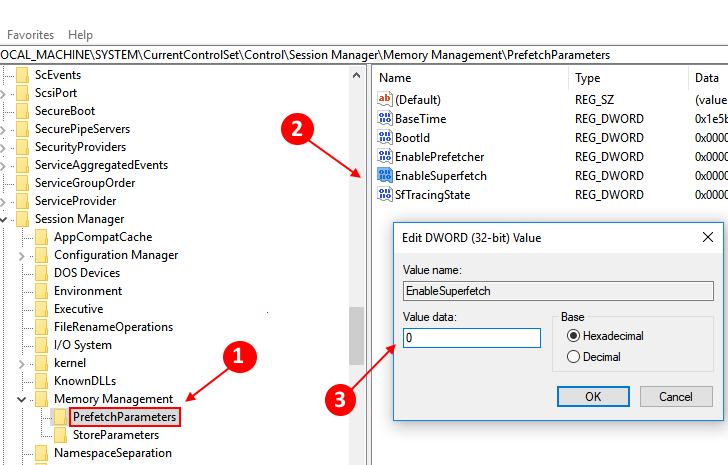
- Within the registry editor, explore through HKEY_LOCAL_MACHINE—System—CurrentControlSet—Control—Session Manager—MemoryManagement, and select “PrefetchParameters“.
- Open up the “Enabled Superfetch” esteem by double-clicking it.
- Change its value to 0 to disable Superfetch. Then click the “OK” button and close down the registry editor.


